I have been writing a data visualization app in Java, using Java2D to render the graphics. Unfortunately, I quickly encountered a data set that brought Java2D (even in accelerated mode) to its knees; so I was forced to evaluate other options. As things turn out, there aren’t a lot of OpenGL tutorials that are geared toward Java that are also recent and beginner-friendly. Additionally, while most tutorials started out demonstrating 2D-use, virtually all of them assumed that the user would switch to 3D soon afterwards, and didn’t go into detail about optimizing OpenGL for 2D use. With this article I will attempt to rectify all of these things. However, I will assume a intermediate familiarity with Java, and a basic knowledge of C-style programming (using constants as function parameters, etc.). The focus will be on data visualization, but this could easily be adapted for a video game.
Note: A complete version of all the code in this tutorial is available in Appendix A.
Choosing a Library
There are two options for making direct, low-level, OpenGL calls from Java: JOGL, and LWJGL. JOGL (Java OpenGL) is based on the original Java 3D code from Sun, and is currently community-maintained. LWJGL (Lightweight Java Game Libary), as the name implies, is geared toward video game creation. As I was not writing a game, my first impulse was to avoid the game library and use JOGL. However, JOGL turned out to be somewhat difficult to set up, lacked good/easy-to-find documentation, and was prone to segmentation faults. LWJGL, on the other hand, was relatively painless to set up, had decent basic documentation, and was totally suitable for non-game applications. For these reasons, I will focus this article on LWJGL, although most of the instructions will apply equally to JOGL (and even often to C/C++).
Note: JOGL uses a pseudo-object-oriented API, whereas LWJGL uses static methods. The LWJGL approach is less Java-like, but makes it easy to use existing OpenGL C/C++ code. The JOGL approach would make sense if it weren’t more than a little half-baked. Because of this difference, the example code provided in this tutorial would require significant alteration before it would work using JOGL.
Setting up LWJGL
Getting the .jar
LWJGL isn’t very hard to add to your project. First you must download lwjgl-x.x.zip (where x.x is the latest version number) from the download page (http://www.lwjgl.org/download.php), and extract it. Next you would add the relevant .jar files to your project. Unless you want to use GLU (which you will want to do if you are rendering polygons), all you need is lwjgl.jar. GLU is included in lwjgl_util.jar. After that, copy the native folder for your OS to the project and point your IDE to it (for example, on Linux the folder is natives/linux). More detailed instructions for each IDE are available in the Getting Started section of the LWJGL wiki.
Including LWJGL in your project
Because LWJGL is a very thin layer on top of the OpenGL C library it is not heavily object-oriented. To keep from going insane (and also to make it easy to copy code written for C/C++), I recommend taking advantage of Java’s static imports. To import the base set of OpenGL functions, add the following above your class definition.
import static org.lwjgl.opengl.GL11.*;
After that you can import other GL classes if you need functions from more recent versions of OpenGL. For example, if you want to use functions originating in OpenGL 1.5 you would import both GL11 and GL15.
import static org.lwjgl.opengl.GL11.*;
import static org.lwjgl.opengl.GL15.*;
Make your IDE less annoying
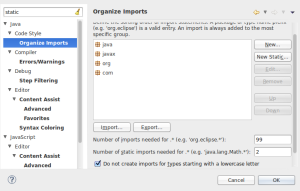
Unfortunately, by default Eclipse will replace these lines with more restrictive static imports when organizing imports. To prevent this behavior, go into the Preferences and go to Java > Code Style > Organize Imports in the tree on the left. Then, change the “Number of static imports needed for .*” to 1 (or 2, or whatever your preference is).
Creating the Display and the Rendering Loop
Setting up the display
Before you can do anything else with OpenGL, you must define a Display. To do so, write the following in the main method:
Display.setDisplayMode(new DisplayMode(800, 600));
Display.create(new PixelFormat(0, 8, 0, 0));
The parameters of the DisplayMode constructor represent the width and height of the window. For the PixelFormat, the parameters in the example should be safe. If you want to enable MSAA (anti-aliasing), change the last parameter to the number of samples you want (16 is usually the maximum on modern GPUs). Keep in mind that on certain operating systems will crash if you attempt to set an unsupported number of samples. Both of these methods will throw an LWJGLException if something goes wrong.
Establishing an initial projection
Next up you have to tell OpenGL to use a 2D projection, and also where to point the camera.
glMatrixMode(GL_PROJECTION);
glLoadIdentity();
glOrtho(0, 800, 0, 600, 1, -1);
glMatrixMode(GL_MODELVIEW);
In the example I set the upper-left of the projection to {0, 0}, and the lower-right to {800, 600} so as to match the window size. At the end we set the matrix mode to GL_MODELVIEW so that we can start adding vertices.
The rendering loop
In OpenGL, the convention is to use a loop to update the screen continuously until the user closes the display.
while (!Display.isCloseRequested()) {
    glClear(GL_COLOR_BUFFER_BIT | GL_DEPTH_BUFFER_BIT);
    //drawing code goes here
    Display.update();
    Display.sync(60);
}
All drawing code, and logic directly related to drawing should be inside this loop. The first thing to do before drawing is to clear what was drawn in the frame before. For this we use the glClear() function. The GL_COLOR_BUFFER_BIT flag tells it to use the default color to clear the screen, this is set to black unless you’ve changed it. Display.update() tells the engine that you have finished drawing and that the buffer can be flipped, in addition to polling the input devices. Display.sync() will wait to continue if not enough time has passed since the last render, keeping the display at the desired frame rate (in this case 60).
Drawing a basic polygon
There are several different ways of instructing OpenGL to render a primitive. The most straightforward of these is called direct mode. Many people on the internet advise against using direct mode because it is slow. I personally think that it is important to evaluate your use case before doing the drawing in a more complicated way.
glBegin(GL_TRIANGLES);
float[] triangle = {
    128, 128, 0,
    256, 128, 0,
    192, 256, 0
};
glColor3f(0, 0.5f, 1);
for (int i = 0; i < triangle.length; i += 3) {
    glVertex3f(triangle[i], triangle[i + 1], triangle[i + 2]);
}
glEnd();
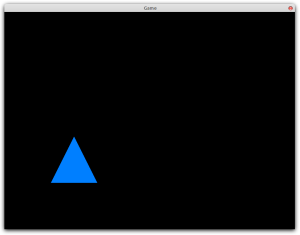
The above code will draw a blue triangle at the coordinates indicated in the array. When rendering a more complicated polygon, one might want to set the color on a per-vertex basis as follows.
glBegin(GL_TRIANGLES);
float[] triangle = {
    128, 128, 0, 0, 0.5f, 1,
    256, 128, 0, 1, 0, 0.5f,
    192, 256, 0, 0.5f, 1, 0
};
for (int i = 0; i < triangle.length; i += 3) {
    glColor3f(triangle[i + 3], triangle[i + 4], triangle[i + 5]);
    glVertex3f(triangle[i], triangle[i + 1], triangle[i + 2]);
}
glEnd();
Conclusion
That’s it for Part 1! In Part 2 I will cover faster and more efficient drawing techniques as well as drawing complicated polygons using the GLU Tessellator. I may also cover user input. Please feel free to contact me with feedback or suggestions.
Appendix A: Complete Code
import static org.lwjgl.opengl.GL11.*;

import org.lwjgl.LWJGLException;
import org.lwjgl.opengl.Display;
import org.lwjgl.opengl.DisplayMode;
import org.lwjgl.opengl.PixelFormat;

public class OpenGL2dDemo {

    public static void main(String[] argv) {
        new OpenGL2dDemo().start();
    }

    public void start() {
        try {
            Display.setDisplayMode(new DisplayMode(800, 600));
            Display.create(new PixelFormat(0, 8, 0, 0));
        } catch (LWJGLException e) {
            e.printStackTrace();
            System.exit(1);
        }

        glMatrixMode(GL_PROJECTION);
        glLoadIdentity();
        glOrtho(0, 800, 0, 600, 1, -1);
        glMatrixMode(GL_MODELVIEW);

        while (!Display.isCloseRequested()) {
            glClear(GL_COLOR_BUFFER_BIT | GL_DEPTH_BUFFER_BIT);

            glBegin(GL_TRIANGLES);
            float[] triangle = {
                128, 128, 0,
                256, 128, 0,
                192, 256, 0
            };
            glColor3f(0, 0.5f, 1);
            for (int i = 0; i < triangle.length; i += 3) {
                glVertex3f(triangle[i], triangle[i + 1], triangle[i + 2]);
            }
            glEnd();
            Display.update();
            Display.sync(60);
        }
    }

}


